Wednesday 10 November 2010

iPhone mount (again)

Finally pulled my finger out and sorted my iPhone mount on my bike. I went about a week before pulling it off again and attempting to get a charger in to the waterproof case ("iDry" from Amazon/eBay) as well.

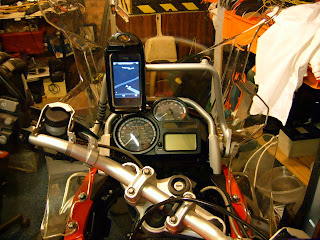
Modified iDry case on BMW GSA.
On-bike view. I use Tom-Tom and MotionX GPS apps.
Protected from the worst of the elements by the screen.
The same mount as before - can be vertical or horizontal.
Cheapo charger bought mainly for cable and connector.
I cut a slot in the inside wall (double wall at bottom) with my Dremel clone. I dismantled the connector and moved the PCB on to short flying leads to allow me to glue the connector in the slot I just made. The PCB sits at a right-angle in the small cavity were the hinge pin sits. Cable entry strain relief, PCB and iPhone connector are all fixed and sealed with hot-melt glue. The particular glue I have remains rubbery and allows the connector to move slightly as I fit or remove my iPhone.

Original cable grommet was used, but it was cheap and split almost immediately.
Standard car power socket spliced into aux power socket (for flexibility).
I spliced a cable mount accessory socket (which I already had in my collection of crap) on to the bike's power socket, which stays on for 5 minutes after key-off. I could have hard-wired it but this gives me more options.

The original iPhone charger I used was one of two (one in the car) cheapo chargers from Amazon. It stopped charging after a couple of rides. Testing showed the DC-DC converter inside didn't seem to always start up correctly. Through this, I found that the iPhone 3G is 12V tolerant - it is protected against having 12-odd volts connected to it's power pins!

I bought another generic phone charger (I already had the connector) from Tesco late one evening. It was rated at 5V 500mA, great, that should do it. After another couple of rides it too was dead. Further testing (which I should have done to begin with) showed that with Sat-Nav running and playing music over Bluetooth; the iPhone 3G was pulling up to 800mA. No wonder the cheap chargers aren't up to it.

I was looking through my parts looking for a LM7805 or similar, I was going to make up a small board. I then came across a small Traco DC-DC converter which I'd forgotten I had. Checking the datasheet; it has a wide input voltage range and adjustable output voltage and current up to 2A! It even has a enable line. Perfect.

I added some caps, as per the datasheet and re-used one of the cheapo housings to keep it together. Plenty of "anti-vibration" hot-melt to keep it from falling apart and the job's a good 'un.

Phone now charges from flat even if in heavy use. I'm a happy chappy.

The bike rocks, BTW. ;-)

Saturday 18 September 2010

New bike, new possibilities

I've got myself a BMW R1200GS Adventure! I'm due to pick it up on Wednesday and can't wait!

I've already got a project in mind for it; a little electronics add-on...
And I'll have space for my iPhone/SatNav now too :-)

An awesome piece of engineering.

Wednesday 8 September 2010

Portable Workspace

Saw this on Make:
http://blog.makezine.com/archive/2010/09/portable_electronics_desk.html
...and it looks amazingly similar to mine, but I cheated; using a existing case. Note the LED work light (telescopic fold-away), old computer PSU from my collection of crap and a battery powered soldering iron (OK for light duty work). This is a pic of me using it at Super Happy Dev Club meet #17.
Portable workspace at SHDC #17.

Wednesday 4 August 2010

EEVBlog #100

I recently got round to watching Dave Jone's one-hundredth EEVBlog. I've watched this strange Australian since day one and he gets a thumbs up from me! Keep it up Dave!

Check out this taster/review on YouTube:
http://www.youtube.com/watch?v=yqomnM3WMX8&feature=youtube_gdata

Tuesday 27 July 2010

Unforeseen situation

Well, it stayed on; didn't work lose and was bone dry inside even after heavy rain. What I hadn't accounted for was the screen randomly spinning; upside-down, side-ways and back again. The Tom Tom app has no screen lock and because my bike has such a small cockpit; there's only one place it can go and it sits at a shallow angle where vibration and bike movement confuse the hell out of the accelerometer. It's useable, but annoying.

Perhaps more damping, somehow. Or a steeper angle (making it harder to see, though).

Ideas welcome.

Sunday 25 July 2010

iPhone mount: final assembly (no power yet)

Reassembled, it doesn't look too bad (IMO), good enough to serve the purpose. I'll test it on the way to work tomorrow, probably with the supplied lanyard tied to the bars (just in case). I didn't put any top-coat on, so let's see how the paint holds up.


iPhone mount: paint and assemble

I've been hanging on to a heavy-duty plastic bracket for about three years now. I think it originally came off a car phone mount; a piece of someone else's junk saved from the skip. Now it seems almost perfect for modding into a handlebar mount, with the addition of some stainless steel M4 screws and a small rectangle of 6mm polycarbonate. Thin sheet rubber (again, saved off-cuts) serves to provide grip and some vibration cushioning.

Old phone bracket serving as bar clamp, screwed into iDry base.
Only a single stainless steel M5 holds the iDry case in place. Will it be enough?
The above photos show the disassembled iDry case; the top comes off simply by pushing out the hinge-pin, and the end locking handle comes off with two small screws.

Some more thin rubber sheet, laid inside, should help prevent scratching and provide a little more cushioning.

Thin rubber sheet and double-sided sticky tape ("for quickness").
Rubber sheet added to bottom and back.
With that done, I needed to spray the in-your-face white. I had white, fluorescent orange or gloss black...
Sprayed gloss black (looks like grey in pic).
Safety lock removed before spraying.
Left to dry briefly before each light coat, then left to dry properly.

Saturday 24 July 2010

iPhone on motorcycle?

I recently bought the Tom-Tom app for my iPhone; it's my first Sat-Nav and worked quite well stuffed inside my jacket pocket, giving turn-by-turn prompts to me over Bluetooth in my helmet. Less than ideal satellite visibility and not being able to see the additional info on the screen, prompted me to mount it on the bike.

My motorbike doesn't have a lot of cockpit space; no fairing or screen and not much room on the bars, so I didn't think the commercial (and expensive) bike mounts would be suitable. Most mounts I found only held the iPhone and offered no impact resistance or weather protection.

So I looked for a hack-together solution. I ordered an iDry waterproof iPhone case from Amazon, with the intention of making holes in it! I need a secure mounting and ideally be able to charge the phone while on the bike.
iDry waterproof case

It's not clear from the photo or the description that the screen cover is a silicon rubber, fine if it's wet, but difficult to pinch-zoom when it's dry. Not that I'm bothered; it'll be difficult enough with gloves on (more on that another time). I don't like the white either, but it doesn't come in any other colour, so I may have to paint it.

I'm not planning on submerging it, so if I'm careful, any holes I make shouldn't be a problem. Although it's also not clear, from either photo or description, if there was any kind of access port for the connector. There isn't. I'm not entirely sure how I'm going to get power into the box in a robust, weatherproof way. Let's get it mounted first, but I have to take account of the opening mechanism:

Operation

Friday 18 June 2010

Old laptops

I had an old laptop that was chugging under XP and I was half thinking of using it for a future desktop fab project. A friend suggested and supplied a Ubuntu installation CD, which installed without hassle (I don't really have any Linux experience). It detected my Wi-Fi network and connected remarkably easily too (better than Windows). I've not had chance to look at it any closer yet.

I've also taken another old laptop off the hands of a colleague, "free to a good home" and it's running XP fairly well. It came with working wireless and I'm thinking of maybe turning it into a large digital picture frame.

So many projects, so little time...

Too good to last

Oh well, my Xbox died again. This time it's terminal. On the bright side; new ones come with a HDMI port and the new slim Elite was just announced at E3, so prices may come down a bit (yeah right!). I don't need a HDD or Wi-Fi (can use existing) so I can get away with the Arcade/Core or whatever it's called now.

I've been working some more on my Sci-Fi UAV flying thing recently. If you're interested, there's a link in the side-bar.

Sunday 25 April 2010

Zombie Xbox 360!

Oh yes! My Xbox is back from the dead; Red Ring of Death is no more!

I had previously stripped my Xbox, which is fun in itself, and borrowed a hot-air reflow blower from work. I removed both heatsinks and cleaned the old heat transfer compound off of the processors with cleaning solvent.


I had a large lump of aluminium round bar sitting on top of the GPU to hold it in place and put some downward pressure on it while I attempted to reflow it. After letting it cool, I refitted the heatsinks; I've only got some of the traditional white heat transfer paste, so I used it, instead of the silver original paste which is probably something similar to "Arctic Silver" or whatever it's called. I plugged in the power supply and AV cable, and powered-up... nothing; RRoD still smiling at me.

BTW the heatsink mod found on the net; didn't appeal to me because the alternative heatsink clamping method wouldn't put pressure in the centre, essentially allowing the PCB to flex and a gap to form between the top of the GPU and the H/S. The original x-spring clips have a centre "point" to prevent it. Also, the suggestion of running the GPU with no cooling or wrapping a towel around it or similar in order to heat the processor up enough to melt its own solder joints sounds like a sure-fire way to knacker it. If you don't kill it straight away, I'm sure you'd reduce its life.

I was deciding what to do with my dead Xbox, now that I couldn't save it. I was about to pack up the reflow gun, ready to take back to work, when I thought I might as well give it another go.

This time I left the H/S on and attempted to blow the hot air under the processor. I gave it a little bit of extra time, because of the H/S. I also thought I should do the CPU as well, it may not be (only) the GPU. Then I left it to cool.

Naked zombie Xbox on trial.

I dropped the drive back in, reconnected the leads and hit the power: the fans ramped to full power (the H/S were still very warm) and I was treated to the usual dance of green lights! As I type, it's been on for about 4 hours playing DVDs. The real test will be when I re-case it and hit it with a 9 hr gaming session!!!

Saturday 10 April 2010

The start of yet something else

Ok, so I created this "hub" as central place to upload info about what I'm working on, or planning to work on, that doesn't yet warrant its own blog. To explain; I'm already working on a functioning Sci-Fi model / VTOL UAV, I'm in the middle of animating a toy meerkat for work and I had to make some mods to my motorcycle helmet recently (links in the sidebar). On top of that I was given a 2 axis stepper driven linear table recently and thought it a great opportunity to look at creating my own CNC machine.


I can share info and photos here on the hub of stuff that may or may not go anywhere, and will link to my other stuff. Blogs are so much more convenient than my old website, that I had to use specific software, edit and upload via FTP, to use.

Anyway, enough rambling; I'm supposed to be doing my assignment :-/